I’ve been learning a little wood work, mainly how to use a table saw, miter saw, nail gun etc. And boy isn’t it fun.😃
I’m very grateful that I have a patient husband who has been teaching me, my memory isn’t that greatest so it is not an easy task. I take my hat off to him for his patience, he must be a saint or something.
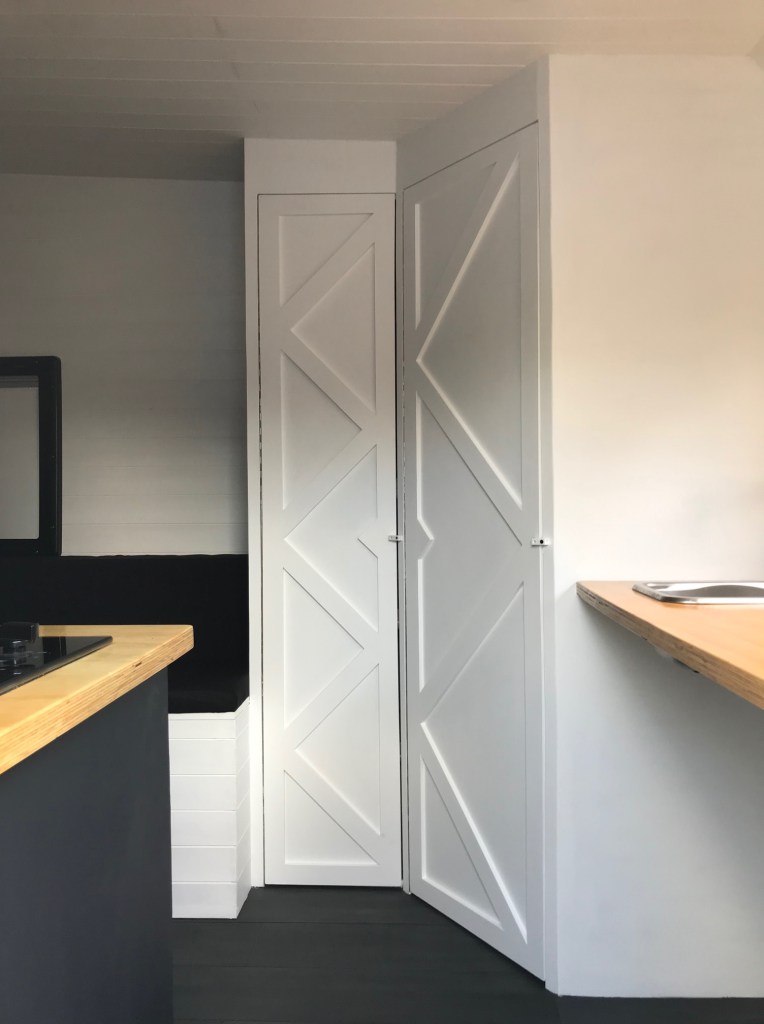
First off we made two doors for our camper Phillippe. A toilet door and a larder door and I couldn’t be more happy with them but also proud. Proud that I actually managed to make something without cutting my hand off or putting a nail through a finger.
They turn out pretty well and are looking fine in Phillippe.
We still need to do the final coat of paint and add the door furniture. Those jobs will have to wait, as he is being given some tender loving care so he can pass the mot before we go away for a long weekend in just under two weeks. Fingers crossed he is all fixed up and better by then.
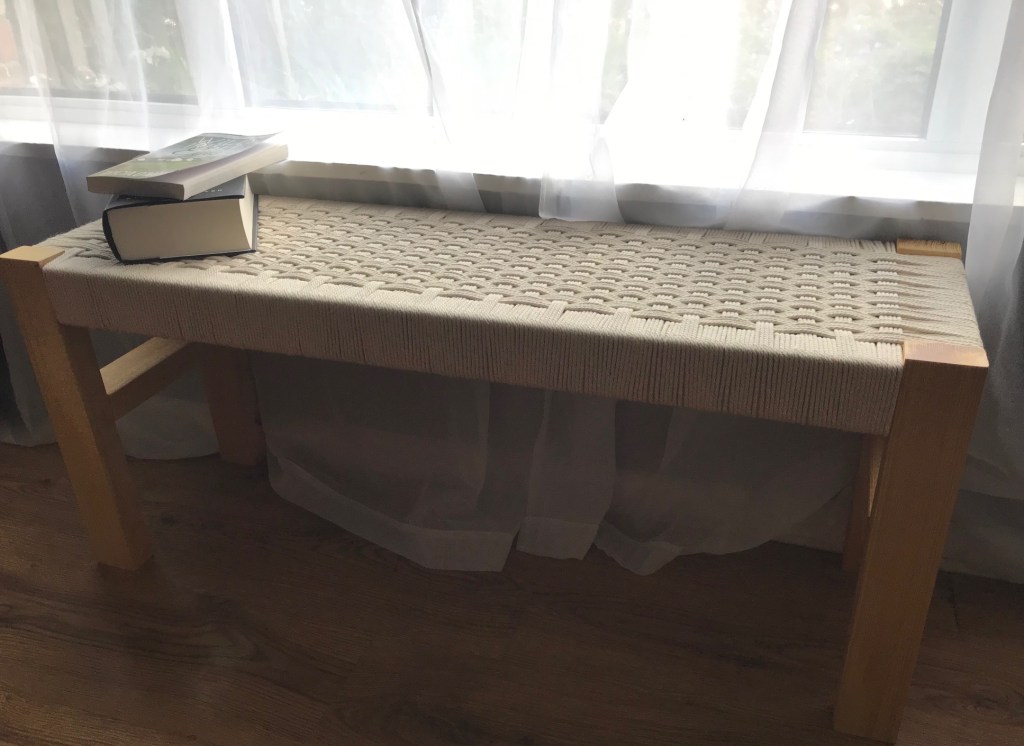
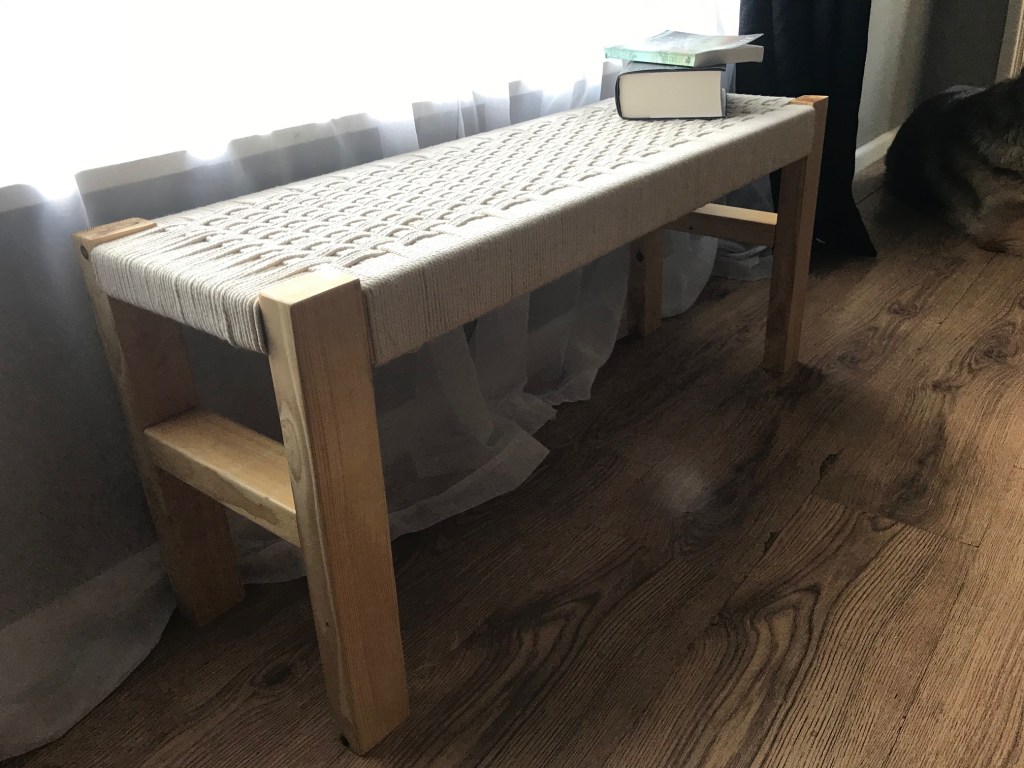
With all work on Phillippe at a standstill, I set myself the challenge of making a small bench for our hallway.
The plan was to buy a nice piece of live-edge wood and turn it into a little seat.
All the live edge wood was disappointing and in awful condition at our local b&q, which sadly threw a spanner in the works, until I happened to come across a photo of a woven bench on instagram taken by Lacie for their gorgous loveresideshere account.
Luck would have it, there was a video tutorial with all the information needed to make your own. Pop on over to Lacie’s Instragram and check out her gorgous photos, stories and saved highlights. Their home is absolutely stunning so please check it out when you are there and give them some love. They are just the sweetest couple. You can find their “Woven Bench DIY” here.
A quick shop on amazon for some crafting cord, a happy mail delivery and a dry sun filled weekend, I was ready to start my own, with Mark at my side to check I was doing everything right and he wouldn’t have to press our lifeline button to get an ambulance out.😁
After measuring the area in our hall we had planned the bench for, we agreed the area was a little small for this particular bench so we decided that I would make a larger one for our front room or maybe our bedroom (depending on how good a job I made.)
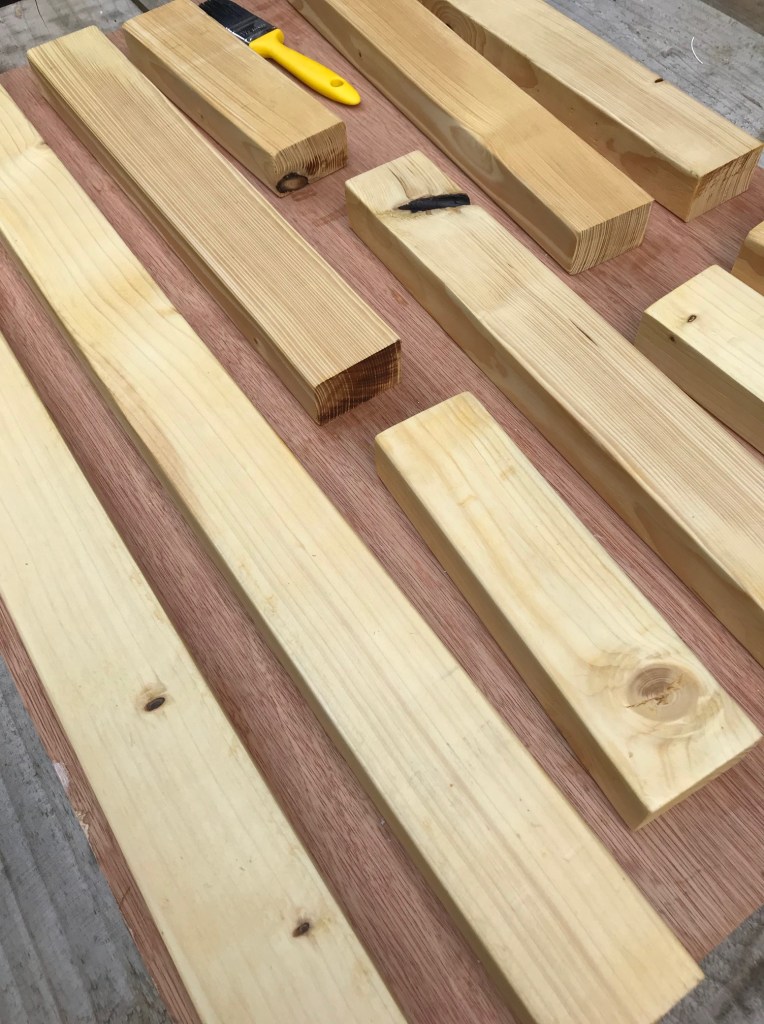
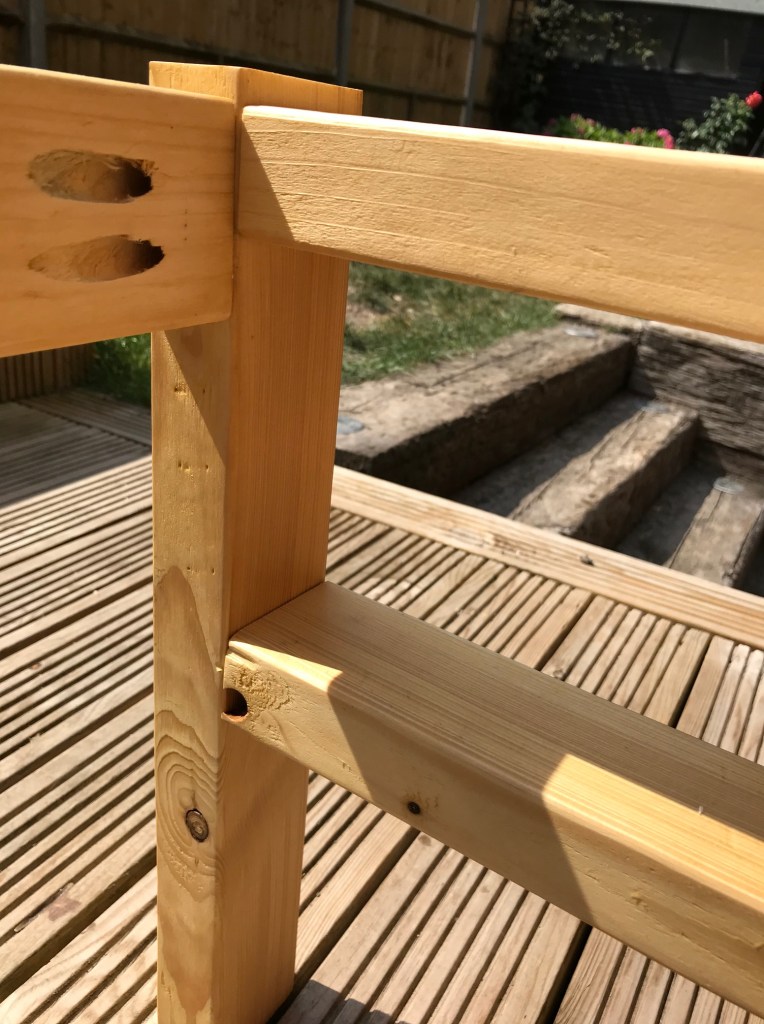
For the bench frame I used, two lengths of 2”x1” timber cut down to
2, 34.5″ lengths for the front and back
4, 9″ lengths of for the sides and side supports
And 4, 17″ lengths of for the legs.
(We may buy another 2×1” to make a cross bar at a later date, which will be 34.5″ long.)
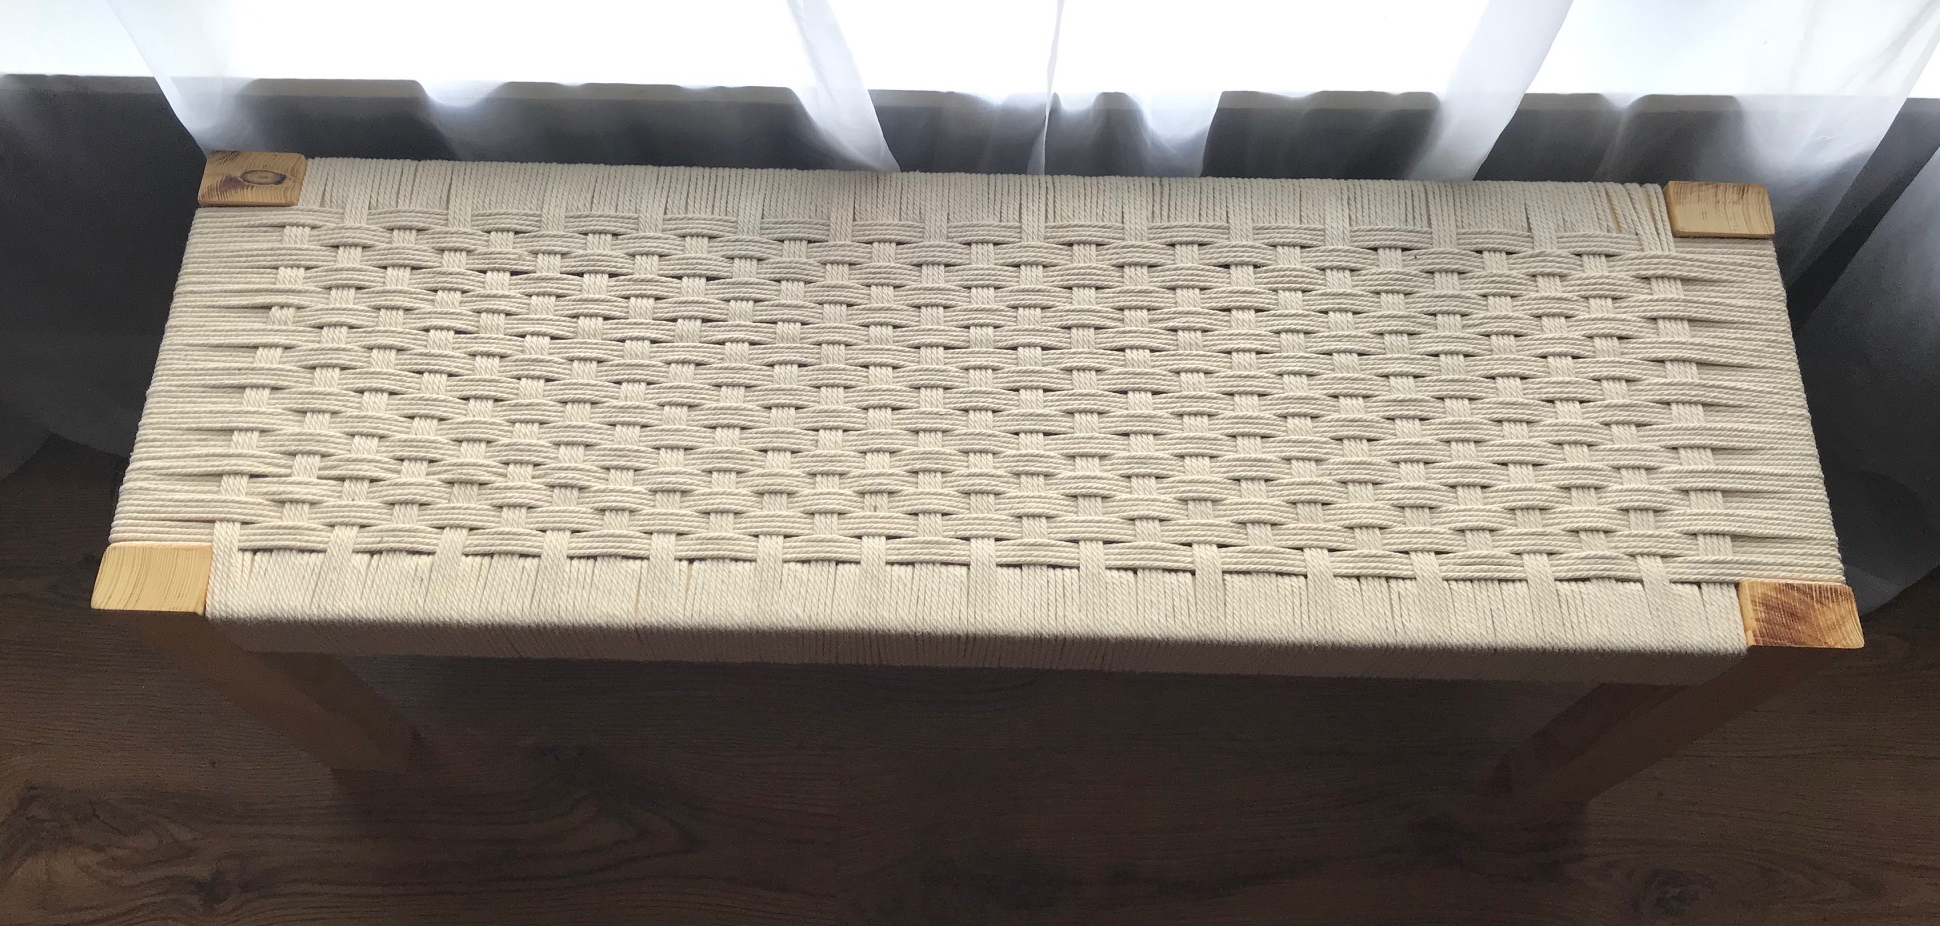
I used 1.5” nails which were bent to make L shape nails. You can buy them already shaped but they are expensive. We just bend our nails with a pair of long nose pliers. The nails are used for the weave.
I put the frame together with wood glue and screws and used my pocket hole jig to give the neatest finish with no screws in plainsight.
A couple of screw positions were a tad awkward but with a little help from Mark the frame was all put together and finished. I can’t believe I got this far with little help but was super glad Mark was watching over me.

I gave the frame a good old sand and two coats of clear varnish . I used a decking varnish we already had, just to keep the cost down.
My original plan was to paint the frame but shamefully I was impatient and just wanted to crack on with all the fun I was having.🛠

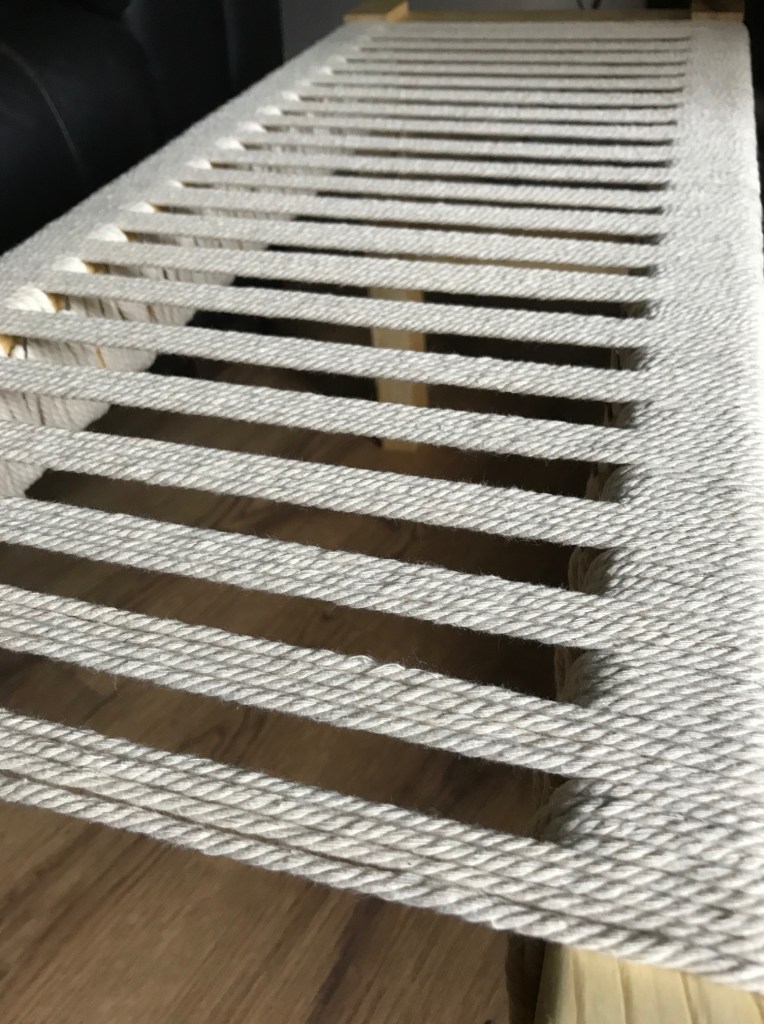
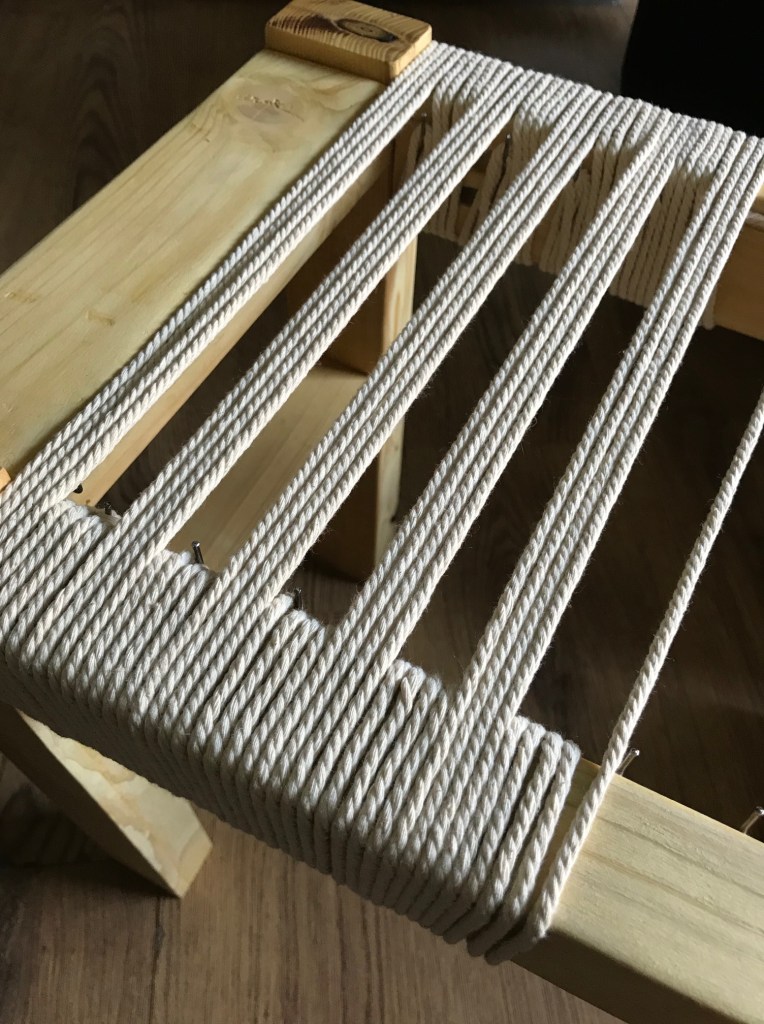
The bent nails were then placed around the inside top edges.
Due to the position of the pocket holes we had to place the nails a little higher than we had hoped.
As you can see the nails are very close to the top edge of the wood.
It worked out fine in the end but it’s something I would definitely change when we make another.

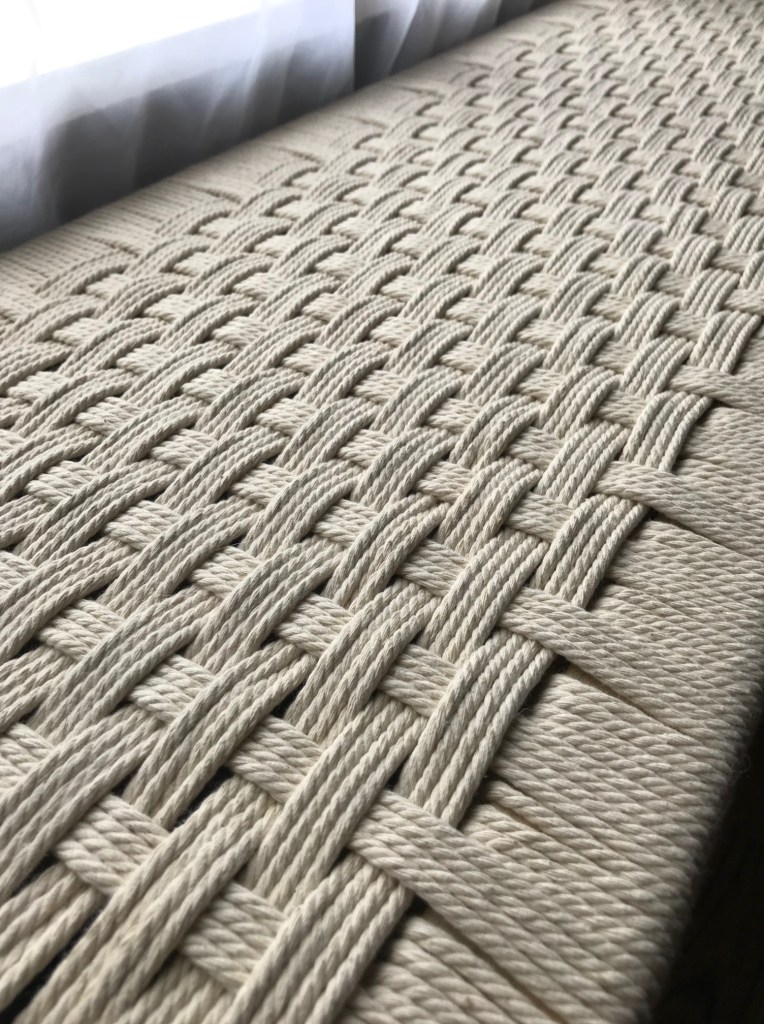
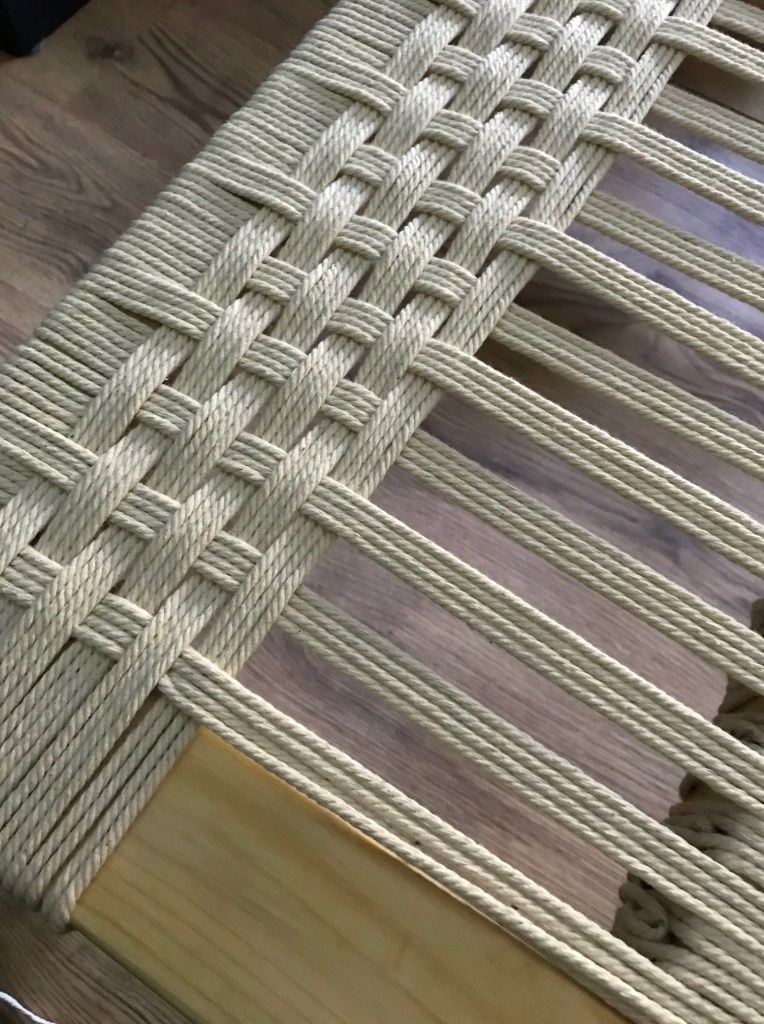
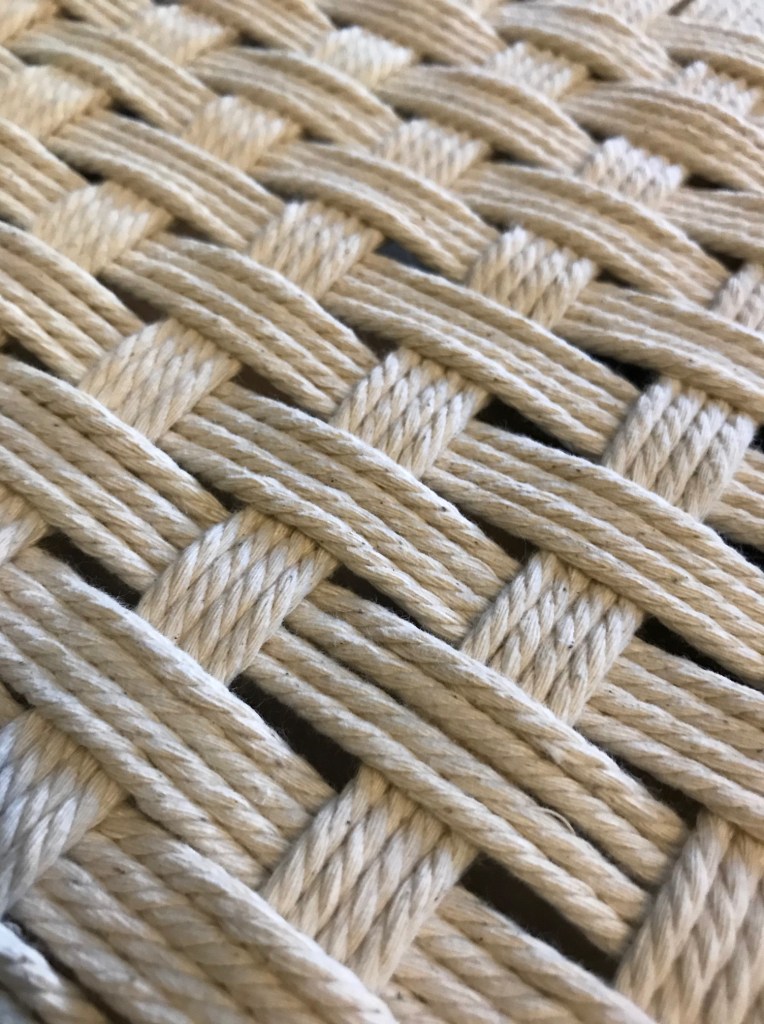
The frame was done and I was all set and ready to start weaving. I popped back on Instagram and rewatched Loveresideshere tutorial a good few times until I felt ready to either fail or achive something I never thought I would.
Loveresideshere used the following weave tutorial for their bench so I popped on over to YouTube and did the same.
I will admit I was very nervous about this part but it was much easier than I had thought and wasn’t long before I had completed the first part of the weave.
For the second part of the weave I referred back to Loveresideshere tutorial. This part was very easy and I was so close to finishing when I ran out of cord.😣 (2 used)

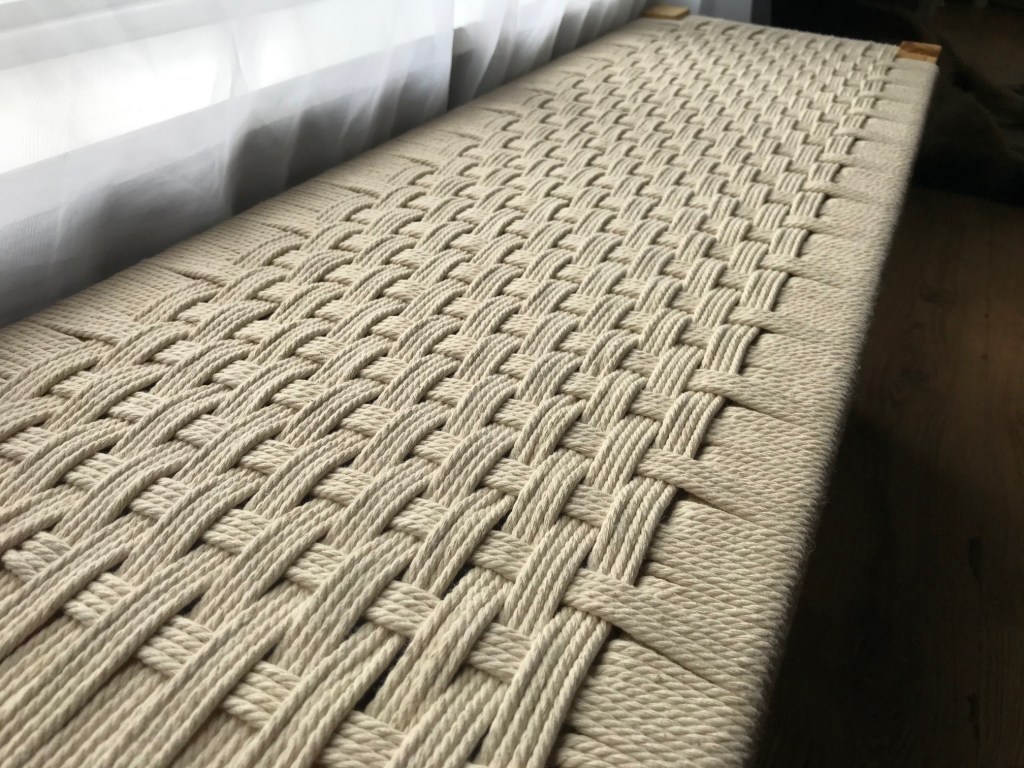
With only a few more passes to make, I couldn’t wait for happy mail to arrive with my newly ordered craftcord.
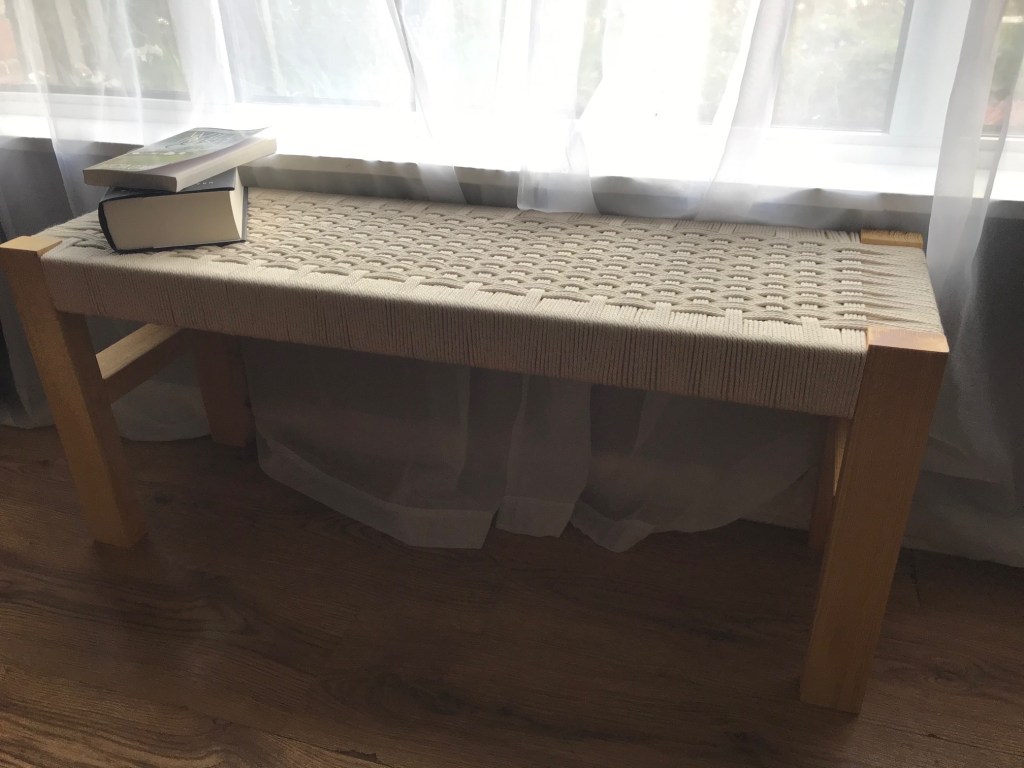
Thankfully the joy of amazon prime meant I didn’t have to wait too long and my bench was finished before I knew it.
So what would I do differently?
Firstly I really wish I had been patient and painted my frame.
Secondly I would have placed my nails a smidgen lower.
Apart from that I absolutely love it.
I just can’t believe I made it, with a little help and guidance from my husband. Thanks babe.

You can make your own for around £47.29 (without cost of varnish or paint)
Ours cost £32.97
The timber we already had but would have cost about £2.38 from buildingmaterials.co.uk or most hardware store eg B&Q or Wickes.
The Craftcord was from amazon, you can find it here. I ended up having to buy 3 costing £32.97
I only used a tiny bit of the 3rd.

The nails we already had but you can pick them up cheap as chips for around £5 if not less, a lot less.
We also already had the wood glue but you can purchase some from amazon at a cost of £4.56. The varnish was already ours but truthfully you really dont have to spend a fortune, use your leftover paint, wax, teak oil, spray paint or varnish you have already in your sheds.
This bench making and weaving is very addictive, I’m already planning my next one or something very similar. Watch this space.


Too-da-loo for now.
🦋🦋🦋

Your bench is brilliant. I want one so expect an order.
LikeLike
Pingback: Round Up, Round Up – August 2020 | Intwined